
Code
WebAssembly and WebGL
Make your own game, now without GOTO 10 statements
In the early 2010s, the browser company Mozilla had a problem. Bashing the browser plugin architecture known as NPAPI had become fashionable, and for good reason: it made it possible to run low-level processor instructions in the browser insecurely, without any kind of security sandboxing. Yet the NPAPI-based Flash plugin had entrenched itself as the only audio and video solution for building browser games and video players, and the freshly released HTML5 family of standards was not yet enough to replace every Flash use case: performance-hungry web games were practically always built with Flash.
Year after year, the top lists of the Firefox browser's crash analytics system were dominated by problems caused by Adobe's closed-source Flash plugin. Because of the bugs and security problems, Mozilla wanted to shut NPAPI down, but to make that possible, technology standards were needed that would fill the gap left by Flash's absence. Mozilla launched the Mozilla Games Initiative project, whose goal was to bring open game technology standards to the web that work without plugins and are comparable to native performance.
A few years earlier, Mozilla had already created a prototype of the WebGL standard, which made it possible to run 3D-accelerated graphics in the browser. The JavaScript language, however, became a bottleneck: rendering complex 3D worlds and simulating their physics in JavaScript was hopelessly slow. JIT compilation is simply not suited to games with harsh real-time demands, and writing JavaScript code whose memory usage the garbage collector does not need to constantly clean up is far too unidiomatic.

An additional challenge was that the games industry did not consider game technology built on JavaScript a credible solution; to guarantee code portability, game engines were as a rule written in C and C++. Within the Mozilla Games Initiative, a rather backwards idea was considered: would it be possible to automatically compile existing C and C++ game engines into JavaScript? This first gave birth to the asm.js specification, which later evolved into the WebAssembly standard.
What is WebAssembly?
Many kinds of virtual machines have been developed for executing different programming languages. For example, Java, JavaScript, C# and Python programs are executed in their own virtual machines (VMs), usually first by interpreting and then by optimizing compilation at runtime (just in time, or JIT).
Some languages (JavaScript, Python) are interpreted directly from source, while in others it is possible to first compile the source into a machine-oriented intermediate language (intermediate representation, IR, e.g. Java, Python and C#), which is then executed and JIT-optimized at runtime.
WebAssembly, in contrast, was designed not for interpretation or JIT compilation but for a new kind of paradigm: streaming ahead-of-time (AOT) compilation. The idea is that instead of high-level IR code, WebAssembly defines a low-level (but, for security reasons, highly structured) IR that is fast to compile into x86 or ARM machine code understood by the processor. This compilation can be done in the browser while the WebAssembly program file (.wasm) is still being downloaded from the web server. That way, compiling even a large WebAssembly program file does not slow down page loading much beyond the network download speed.
WebAssembly is not meant to be written by hand; it is meant to be generated by some tool, just as has long been the case with native machine code too. So we'll skip wading through dull low-level specifications and focus instead on how WebAssembly code is produced with a compiler.
WebAssembly also does not bring any new functional APIs to the browser: graphics, audio and input are still handled with familiar JavaScript specifications such as the WebGL, Web Audio and HTML DOM standards. When programming such applications, we therefore hop flexibly between two languages – C++ and JavaScript – implementing the computationally intensive part in C++ and the handling of browser APIs in familiar JavaScript code.
C and C++ programs in the web browser
In this article we scratch the surface of WebAssembly technology through hands-on programming. We will implement our own 2D game in C++ using WebGL and compile it with the Emscripten toolchain into WebAssembly to run in a web browser. You can put the end result on some web server and give a friend a link, through which they can start playing instantly, regardless of their computer's architecture and without downloads or installs.
The article assumes prior experience with C++ as well as HTML and JavaScript, but just like the type-it-in-yourself BASIC programs of the olden days, a beginner should be able to manage this too by patiently copying the code into their own project. The most challenging part of implementing the game is copying the code into the .cpp file in the right order. C++ requires that every variable and function is declared in the source file before the line of code that refers to it. Otherwise the compiler emits a “use of undeclared identifier” error.

The program code is presented as a series of listings divided into sub-parts, meant to be typed into your own project one listing at a time. After adding each listing, the program should compile and be testable. The line numbers of the listings jump ahead and tell where in the final game code each line of the program is located. This way the line numbers help you figure out where each block of code should be inserted.
Emscripten is a compiler suite comparable to the GCC and Clang toolchains, which builds programs written in C and C++ into a collection of HTML, JavaScript and WebAssembly files that browsers can display directly. The Emscripten compiler is based on LLVM technology and runs on Windows, macOS and Linux host operating systems. Emscripten + WebGL + WebAssembly is the technology stack that lets Unreal Engine 3 and 4, Godot, Unity 3D and other native game engines run directly in the web browser.
Emscripten is installed using an SDK manager called emsdk. Once git is installed (see Skrolli 2019.1, Git version control basics), you can install emsdk and Emscripten by running from the command line
git clone https://github.com/emscripten-core/emsdk
cd emsdk
emsdk install latest
emsdk activate latest
On Linux and macOS, run ./emsdk instead of plain emsdk.
After this, Emscripten is installed on the machine. The easiest way to use Emscripten is to enter the so-called Emscripten environment in the active command prompt, where the compiler tools are made available in the PATH variable. This is done by running emsdk_env (Windows) or source ./emsdk_env.sh (Linux and macOS).
If you start a new command prompt, the above emsdk_env step needs to be run again.
C and C++ programmers are now in familiar territory: Emscripten is run with the same flags as the gcc or g++ compilers (or clang and clang++), just by invoking the commands emcc or em++ instead. For example, Kernighan's program
#include <stdio.h>
int main() {
printf("hello, world\n");
}
now compiles by running em++ hello_world.cpp -o hello.html. Running this command produces three files: hello.html, hello.js and hello.wasm.
If you are familiar with Node.js, you can run this output from the command line by executing
node hello.js
The command prints “hello, world” to the console. So Node.js also supports WebAssembly-based command-line programs.
If you want to run the page in a web browser instead of the command line, you need a web server for it. Any of the nginx, Apache or IIS packages will do, but especially during development it is easiest to use some ad hoc server that can quickly serve HTML files to the browser on your own machine. The Emscripten toolchain provides the emrun command for this, which works by running
emrun hello.html
or
emrun --no_browser . --port 8000
or, using Python 3,
python3 -m http.server 8000
Of these, the first command opens the hello.html page directly in the default browser, while the second and third commands serve the whole working directory for the browser to visit at http://localhost:8000/.
For the truly curious, the Emscripten toolbox also offers the wasm-dis command, which disassembles a .wasm file into a textual .wast file (“WebAssembly text”), if you feel like peeking under the hood.
(func $is_key_pressed (param $0 i32) (result i32) (if (i32.eqz (i32.load8_u (i32.add (local.get $0) (i32.const 68976) ) ) ) (return (i32.const 0) ) ) (i32.eqz (i32.load8_u (i32.add (local.get $0) (i32.const 3440) ) ) ) )The game project's C++ function is_key_pressed() in WebAssembly Text form, opened with the wasm-dis tool.
“Make games, not engines”
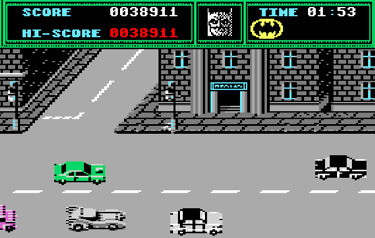
Now that we know how to run the compiler, we'll jump straight into getting pixels on the screen. The article presents a reader project that re-implemented, in so-called endless runner form, the wild driving sequence from the old Commodore 64 classic Batman: The Movie. Exactly the one where the player speeds through the streets in the Batmobile dodging civilian cars, the one you never got through, and when you ran out of lives you pressed play on the cassette deck to skip to the game's last level.
“Bat Chase” – you will certainly never forget this game.
At first you might think that making a game requires a game engine, but on the contrary, we'll leave out such needless abstractions and indirections. The fewer wrappers, modules and plugins there are in the code, the more we can focus on the essentials of implementing the game, and the more clearly we can see the forest of game development on the WebAssembly platform for the trees.
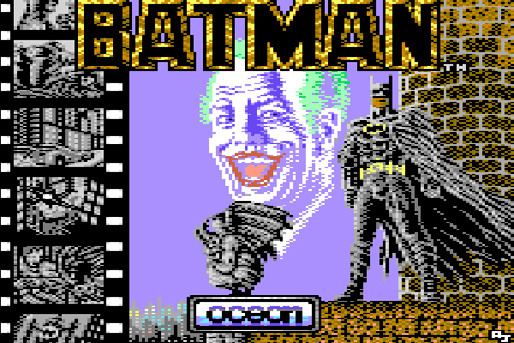
Our strategy is to implement a renderer that draws 2D sprites and text, a keyboard input system, a music and sound effect player, a scene and state model, and the game's update loop. All of this, plus the logic of the Batman game on top, we'll pull off at the lowest possible level without a jungle of libraries, in only about five hundred lines of code – hold my beer. The end result is a minimalistic but still generic 2D game code structure, whose building blocks you can adopt to go on and create WebAssembly + WebGL based 2D games of your own.
Canvas & Context
The WebGL API connects to an HTML page through the <canvas> element. The canvas is a drawing window that physically takes up space on the web page, into which the game is rendered with 3D acceleration through the WebGL API. To get started, we don't need to define the HTML page ourselves; the default page provided by Emscripten already contains a suitable <canvas> tag. Our job is to define the size of that element and to initialize a WebGL rendering context on top of the canvas element. Since our HTML page is meant to contain only WebGL-drawn content and no other HTML elements, we enlarge the canvas to cover the whole HTML page.
The canvas element of the HTML browser distinguishes between two notions of size: the canvas's visible size on the page (“CSS size”) and the size of the WebGL context's rendering surface (“WebGL render target size”). The browser stretches the WebGL surface, bilinearly by default, onto the image area defined by the canvas. When writing these definitions, it's good to keep in mind what kind of coordinate system you want for the game. In this demo we use a fixed-size game coordinate system that matches the size of the drawing surface (an arbitrarily chosen 569×388 pixels), and let the browser stretch this image across the whole browser window. Our program code begins:
1#include <emscripten/html5.h>2#include <webgl/webgl2.h>25#define GAME_WIDTH 56926#define GAME_HEIGHT 38827#define STREET_HEIGHT 1602829#define MIN(x, y) ((x) < (y) ? (x) : (y))30#define MAX(x, y) ((x) > (y) ? (x) : (y))201void init_webgl() {202 EM_ASM(document.body.style = 'margin: 0px; overflow: hidden; background: #787878;');203 EM_ASM(document.querySelector('canvas').style['imageRendering'] = 'pixelated');204 double scale = MIN(EM_ASM_DOUBLE(return window.innerWidth) / GAME_WIDTH, EM_ASM_DOUBLE(return window.innerHeight) / GAME_HEIGHT);205 emscripten_set_element_css_size("canvas", scale* GAME_WIDTH, scale*GAME_HEIGHT);206 emscripten_set_canvas_element_size("canvas", GAME_WIDTH, GAME_HEIGHT);207208 EmscriptenWebGLContextAttributes attrs;209 emscripten_webgl_init_context_attributes(&attrs);210 attrs.alpha = 0;211 attrs.majorVersion = 2;212 emscripten_webgl_make_context_current( emscripten_webgl_create_context("canvas", &attrs));…244}445int main() {446 init_webgl();…461}Listing 1. batman.cpp – Creating the WebGL context.
Compile this program with Emscripten using the flags -lGL -sMIN_WEBGL_VERSION=2 -sMINIMAL_RUNTIME=1. Of these directives, the first links in the WebGL library; the second tells it that we specifically intend to use WebGL 2; and the third enables a simple HTML page in which we can easily get a full-screen canvas element. In other words
em++ batman.cpp -lGL -sMIN_WEBGL_VERSION=2 -sMINIMAL_RUNTIME=1 -o batman.html
The easiest way to launch the result in a browser is to run emrun batman.html. The emrun server is stopped with the key combination Ctrl-C.
If you want the game to work on older browsers (old versions of Safari in particular), you can try leaving the WebGL context at version 1.
Right at the beginning of the function init_webgl(), one of the unique features of the Emscripten environment is introduced: the EM_ASM() and EM_ASM_DOUBLE() macros allow a C or C++ program to embed JavaScript code inline. The EM_ASM_DOUBLE() macro runs the given JavaScript snippet and returns a value of type double, whereas EM_ASM() returns void. (A version EM_ASM_INT() is also available.) The EM_ASM family of statements are handy shortcuts for running short pieces of JavaScript API code, especially in the prototyping phase, although for larger blocks Emscripten's JavaScript library files are recommended; we'll get to know those a bit later.
Line 204 of listing 2 computes the largest scale factor by which the image can be enlarged so that it fills the browser window while preserving the aspect ratio.
After setting the CSS size of the canvas element and the size of the rendering surface, the function initializes a WebGL 2 context using Emscripten's WebGL 2 system calls. WebGL 2 is functionally equivalent to the OpenGL ES 3.0 API, so if you have that down, programming the WebGL 2 API through Emscripten will look very familiar. OpenGL programming was covered in Skrolli issues 2013.2, 2013.3, 2013.4 and 2014.1.
At the end of the function init_webgl(), the created graphics context is made active with the call emscripten_webgl_make_context_current(). This corresponds to the *_make_current() abstraction familiar from the EGL/WGL/GLX/CoreGL standards, where exactly one graphics context per thread is in use at a time. All gl* commands called after this target that active context.
By now, it is probably dawning on the reader that Emscripten offers a whole C-language system library world of its own. Emscripten's own system functions generally start with the word emscripten_. Their reference documentation can be found at emscripten.org.
Drawing loop
If you run the program above, the result is a bat-black canvas. Let's test that the code works by extending it a little with a drawing loop that changes the color of the canvas element.
3#include <emscripten/em_math.h>248EM_BOOL game_tick(double t, void *) {* glClearColor(emscripten_math_sin(t/500.0), 0.f, 0.f, 1.f);* glClear(GL_COLOR_BUFFER_BIT);261 return EM_TRUE; // Keep the game loop running262}445int main() {446 init_webgl();447 emscripten_request_animation_frame_loop(&game_tick, 0);…461}Listing 2. batman.cpp – Game loop. Lines marked with an asterisk are test code that can be removed from the final program.
This should produce a canvas flashing red to the rhythm of a Gotham ambulance's emergency lights. The code features the screen-clearing functions of the WebGL/OpenGL ES API: glClearColor() sets the RGBA color, on a scale of [0.0, 1.0], with which the screen is wiped, and glClear() clears the screen.
The code also contains a few new Emscripten system calls. JavaScript programmers will notice something familiar in them: the emscripten_math_sin() function executes JavaScript's Math.sin() function, and emscripten_request_animation_frame_loop() starts a requestAnimationFrame()-based animation loop. This function is given a callback function of our own as its argument, here game_tick(), which the browser starts calling repeatedly in step with the display's refresh rate to implement the animation loop. The browser passes game_tick() the wall-clock time t as a parameter, giving the time the web page has been running in milliseconds. Unlike native C and C++ programs, programs run in the browser with Emscripten do not (usually) terminate when the main function returns; instead the program continues executing asynchronously for as long as the browser page is open.
The function game_tick() should return EM_TRUE if the animation is to continue. If the function returns EM_FALSE, the animation loop – and thus, in this case, the whole program – ends.
Shaders+vertices
When using the WebGL API, drawing always happens through vertex and fragment shader programs. So we need a piece of code that compiles a GLSL shader program for drawing 2D images for use by the graphics card. We use only a single shader program, which we will apply to drawing both 2D sprites and text on screen. We add the following code:
115GLuint compile_shader(GLenum type, const char *src) {116 GLuint shader = glCreateShader(type);117 glShaderSource(shader, 1, &src, NULL);118 glCompileShader(shader);119 return shader;120}121122GLuint create_program(GLuint vertexShader, GLuint fragmentShader) {123 GLuint program = glCreateProgram();124 glAttachShader(program, vertexShader);125 glAttachShader(program, fragmentShader);126 glBindAttribLocation(program, 0, "pos");127 glLinkProgram(program);128 glUseProgram(program);129 return program;130}131132GLuint vertexBuffer, matrixPosition, colorPosition;201void init_webgl() {…213 static const char vertex_shader[] =214 "attribute vec4 pos;"215 "varying vec2 uv;"216 "uniform mat4 mat;"217 "void main(){"218 "uv=pos.xy;"219 "gl_Position=mat*pos;"220 "}";221 GLuint vs = compile_shader(GL_VERTEX_SHADER, vertex_shader);222223 static const char fragment_shader[] =224 "precision lowp float;"225 "uniform sampler2D spriteTexture;"226 "uniform vec4 constantColor;"227 "varying vec2 uv;"228 "void main(){"229 "gl_FragColor=constantColor*texture2D( spriteTexture,uv);"230 "}";231 GLuint fs = compile_shader(GL_FRAGMENT_SHADER, fragment_shader);232 GLuint program = create_program(vs, fs);233 matrixPosition = glGetUniformLocation(program, "mat");234 colorPosition = glGetUniformLocation(program, "constantColor");235236 glEnable(GL_BLEND);237 glBlendFunc(GL_SRC_ALPHA, GL_ONE_MINUS_SRC_ALPHA);…244}Listing 3. batman.cpp – Shader program.
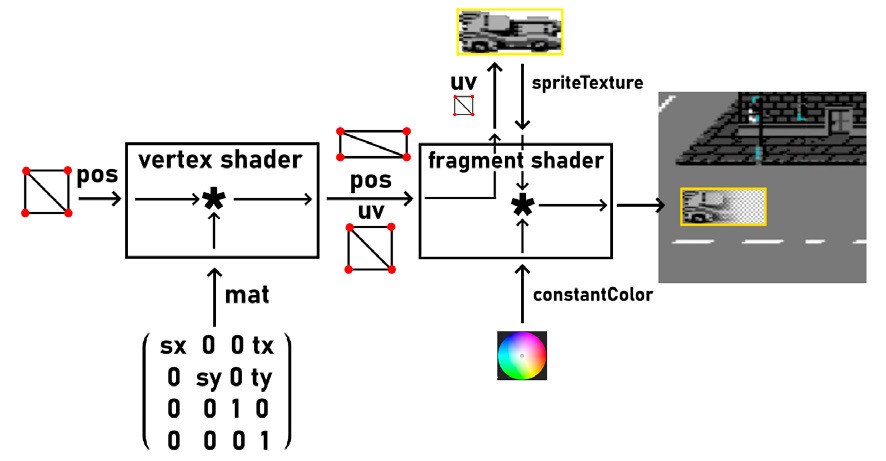
The GPU runs the vertex shader code for each vertex (here, the four corner points of the sprite) and the pixel shader code for each image pixel of the sprite being drawn.
We implement a vertex shader suited to drawing 2D images: the shader reads a single position attribute pos and transforms it to the desired place on screen using the 4×4 matrix mat. We set the values of this matrix in the drawing function right before each draw call. From the position attribute pos, we also derive the UV coordinates uv for the texture unit.
The fragment shader, in turn, computes the color value of each pixel by reading texels from the texture spriteTexture and modulating their colors with the desired constant color constantColor. This modulation lets us draw text in different colors, but the parameter could also be used, for example, to implement an alpha fade effect, a fade-to-black effect or other tinting of image pixels.
At the end of initialization, we enable the renderer's alpha blending feature on line 236. This makes sure the transparency data (alpha channel) in PNG images and fonts is taken into account when drawing sprites.
The sprite renderer's initialization code is complete except for the geometry buffer. We initialize it in a few lines as follows:
201void init_webgl() {…238 glGenBuffers(1, &vertexBuffer);239 glBindBuffer(GL_ARRAY_BUFFER, vertexBuffer);240 const float pos[] = { 0, 0, 1, 0, 0, 1, 1, 1 };241 glBufferData(GL_ARRAY_BUFFER, sizeof(pos), pos, GL_STATIC_DRAW);242 glVertexAttribPointer(0, 2, GL_FLOAT, GL_FALSE, 0, 0);243 glEnableVertexAttribArray(0);244}Listing 4. batman.cpp – Geometry buffer.
The code creates a vertexBuffer object containing the data for drawing a unit square made of two triangles (1st triangle coordinates (0,0) → (1,0) → (0,1) and 2nd triangle coordinates (0,1) → (1,0) → (1,1)).
Since the program uses no other geometry buffers, we make this VBO active right at initialization. We now have a GPU program ready that draws matrix-transformed, texture-sampled rectangles on the HTML canvas, but to try it out in practice, we still need a piece of code that loads a PNG image into the graphics card's texture memory.
PNG images
One of the perks of high-level browser programming is that the browser comes with ready-made functionality for loading images. So we don't need to integrate some C or C++ image loading library such as libpng, stb_image or DevIL. Instead, we build a bridge from C++ to the JavaScript side, where we instruct the browser to load an image from the desired URL and upload the result directly into GPU memory using the WebGL API.
We could use the EM_ASM() block introduced earlier, but since there are more than a couple of lines of JavaScript, we create a new file library_batman.js, in which we write JavaScript library functions:
1mergeInto(LibraryManager.library, {2 upload_flipped: function(img) {3 GLctx.pixelStorei(0x9240/*GL_UNPACK_FLIP_Y_WEBGL*/, true);4 GLctx.texImage2D(0xDE1/*GL_TEXTURE_2D*/, 0, 0x1908/*GL_RGBA*/, 0x1908/*GL_RGBA*/, 0x1401/*GL_UNSIGNED_BYTE*/, img);5 GLctx.pixelStorei(0x9240/*GL_UNPACK_FLIP_Y_WEBGL*/, false);6 },78 load_image__deps: ['upload_flipped'],9 load_image: function(glTex, url, outWidth, outHeight) {10 let img = new Image();11 img.onload = () => {12 HEAPU32[outWidth>>2] = img.width;13 HEAPU32[outHeight>>2] = img.height;14 GLctx.bindTexture(0xDE1/*GL_TEXTURE_2D*/, GL.textures[glTex]);15 _upload_flipped(img);16 };17 img.src = UTF8ToString(url);18 },65});Listing 5. library_batman.js – Loading an image file.
This JavaScript file is an Emscripten JS library file, and it contains JavaScript functions that are linked together with the C++ program. These functions are always written inside the block mergeInto(LibraryManager.library, { ... });. The library file must be enabled in the program's link stage by passing the parameter --js-library library_batman.js to the em++ command.
The file defines two functions: upload_flipped and load_image. The role of the first is to upload the given JavaScript image element into GPU texture memory. So that it shows up the right way round, we want to copy the image mirrored in the Y direction (because of coordinate system conventions), so the function texImage2D() is wrapped inside pixelStorei() setting calls.
Several interesting steps happen in the function load_image. We create an HTML Image element and give it an onload handler. Finally, the load starts when we set the image's address as a string into the image element's src attribute. When calling from the C and C++ world into JavaScript, C strings are pointers, i.e. JavaScript Number values, so they have to be converted into JavaScript strings by calling the Emscripten system function UTF8ToString(). This is generally called type marshalling between programming languages.
The image file will load asynchronously in the browser. The onload function implements a piece of code that runs when the image has finished loading. First, we store the image's width and height on the C++ side at the memory addresses given by two pointer variables, which is done by writing to Emscripten's reserved memory array HEAPU32. That way we know later in the 2D renderer what size the image should be drawn on screen. The function pair bindTexture() and _upload_flipped() then performs the actual upload of the image into GPU memory. Note the extra character _ in front of the word _upload_flipped. This is due to the C naming convention used to handle name conflicts between the C and JS languages, much as native compilers handle name conflicts between C, C++ and native machine code.
Because the upload_flipped function is called from the function load_image, the JS file contains a dependency declaration for the Emscripten linker on line 8 of listing 5. This helps the linker work out the required function call tree at link time, so that the function upload_flipped is not left out of the build.
The function load_image, on the other hand, will be called from C++ code. We can call functions defined in this file from the C++ world as long as we first declare them there using the extern "C" naming convention. This is how we combine both C++ and JavaScript code in our program.
The functions refer to the variable GLctx. This variable means the WebGL context that we made active earlier by calling the function emscripten_webgl_make_context_current().
Continuing the batman.cpp file:
142extern "C" void load_image(GLuint glTexture, const char *url, int *width, int *height);143144GLuint create_texture() {145 GLuint tex;146 glGenTextures(1, &tex);147 glBindTexture(GL_TEXTURE_2D, tex);148 glTexParameteri(GL_TEXTURE_2D, GL_TEXTURE_MIN_FILTER, GL_NEAREST);149 glTexParameteri(GL_TEXTURE_2D, GL_TEXTURE_MAG_FILTER, GL_NEAREST);150 glTexParameteri(GL_TEXTURE_2D, GL_TEXTURE_WRAP_S, GL_CLAMP_TO_EDGE);151 glTexParameteri(GL_TEXTURE_2D, GL_TEXTURE_WRAP_T, GL_CLAMP_TO_EDGE);152 return tex;153}154155void draw_image(GLuint glTexture, float x, float y, float width, float height, float r=1.f, float g=1.f, float b=1.f, float a=1.f) {156 const float pixelWidth = 2.f / GAME_WIDTH;157 const float pixelHeight = 2.f / GAME_HEIGHT;158 float spriteMatrix[16] = {159 width*pixelWidth, 0, 0, 0,160 0, height*pixelHeight, 0, 0,161 0, 0, 1, 0,162 (int)x*pixelWidth-1.f, (int)y*pixelHeight-1.f, 0, 1163 };164165 glUniformMatrix4fv(matrixPosition, 1, 0, spriteMatrix);166 glUniform4f(colorPosition, r, g, b, a);167 glBindTexture(GL_TEXTURE_2D, glTexture);168 glDrawArrays(GL_TRIANGLE_STRIP, 0, 4);169}Listing 6. batman.cpp – Creating and drawing textures.
Here the function create_texture() creates a new GL texture and changes its parameters to better suit drawing 2D sprites by disabling the mipmapping and texture wrap features that are on by default, which in GL are intended more for texturing 3D models.
The draw_image() function in turn contains a bit of raw matrix math. spriteMatrix is an affine two-dimensional translation and scaling matrix that transforms the coordinates of the vertex buffer's unit square to the requested place on screen. In the GL standard, the screen's XY coordinates are normalized to the range [-1.0, 1.0], i.e. coordinate (-1,-1) corresponds to the bottom-left corner of the canvas and (1,1) to the top-right corner. In our game coordinate system, on the other hand, (0,0) is the bottom-left corner and (GAME_WIDTH, GAME_HEIGHT) the top-right corner, so this 4×4 matrix (of which we leave the third, Z dimension unused) maps the game coordinate system into the normalized GL coordinate system with an affine transformation, using a single matrix-vector product (the mat*pos expression in the vertex shader code).
The function glUniformMatrix4fv() passes the matrix to the shader code, while glUniform4f() passes the desired texture modulation color to the fragment shader (into the variable constantColor). The function glBindTexture() activates the image to be drawn, and glDrawArrays() sends the actual draw call. This is how we get a sprite visible on screen.
Let's try this code in practice. We load an image file and change the earlier animation loop to draw the image as follows:
*GLuint testImage;*int testImageWidth, testImageHeight;248EM_BOOL game_tick(double t, void *) {* draw_image(testImage, 0, 0, testImageWidth, testImageHeight);261 return EM_TRUE; // Keep the game loop running262}445int main() {446 init_webgl();447 emscripten_request_animation_frame_loop(&game_tick, 0);* testImage = create_texture();* load_image(testImage, "title.png", &testImageWidth, &testImageHeight);461}Listing 7. batman.cpp – Image drawing test. Lines marked with an asterisk are test code that can be removed from the final program.
The image files are placed in the same folder as the batman.html file, so that the browser can load them from the right address.
The test code above is an important milestone in the development of our game: the 2D renderer and the animation loop are now complete. The renderer is simple but entirely sufficient. A professional graphics programmer would criticize it as inefficient, since a separate draw call is spent on drawing each sprite. A classic showcase of graphics programming skill is indeed to implement atlasing of sprite textures and instancing and/or batching of draw calls, so that a single draw call draws several sprites – a fitting idea for further development if you feel like scaling the routine to draw thousands of sprites on screen at once.
Loading images
Since games consist of many data files, an important part of game engines is a resource manager that handles the game's assets. This game also needs several PNG images and sound files, but because our game is so small, we can list all the assets the game needs already at coding time, and they can all be loaded into memory right when the game starts. So we write the world's simplest “resource system” for loading image files:
32struct Image {33 const char *url;34 GLuint glTexture;35 int width, height;36};3738Image images[] = {39 {},40 { "title.png" },41 { "scorebar.png" },42 { "road.png" },43 { "batman.png" },44 { "life.png" },45 { "car1.png" },46 { "car2.png" },47 { "car3.png" },48 { "car4.png" },49 { "car5.png" },50 { "car6.png" },51 { "car7.png" },52 { "car8.png" }53};54// In the same order as in the images array:55enum {56 IMG_TEXT = 0,57 IMG_TITLE,58 IMG_SCOREBAR,59 IMG_ROAD,60 IMG_BATMAN,61 IMG_LIFE,62 IMG_CAR1, // ..., IMG_CAR863};445int main() { [ ... ]448 for(Image &i : images) {449 i.glTexture = create_texture();450 if (i.url) load_image(i.glTexture, i.url, &i.width, &i.height);451 }…461}Listing 8. batman.cpp – Resource system for image files.
We don't need an abstraction any more complex than this. The struct Image keeps track of an image file: its URL, the GL resource handle, and the image's width and height in pixels. From Image structs we form the array images, which contains the file names of all images used by the game. The first index 0 of the array is left empty, because we will later use it for programmatically generated text strings. We also create IMG_* identifiers matching the indices of these image files, so that in code we can readably refer to images[IMG_BATMAN] instead of writing images[4].
At the start of the main() function we add a loop that creates the needed GL textures and starts loading each image file from the web server. This way the images become available for rendering the game logic, though asynchronously, so on a slow internet connection the images pop into view while the game is already running. If we wanted to, we could implement a loading screen that waits until all images have finished loading before starting the game, but for a game this small it isn't worth the trouble.
Scene model
The objects of the game world are tracked by a scene data structure. Every game has one, and it is most commonly based on composition, or sometimes, less often, on inheritance. Composition-based systems are full of terms like Entity-Components system (EC), Entity-Component-System (ECS) or Entity-Component-Attributes (ECA), which in practice mean the same thing. Such systems have been in use for a good twenty years. Inheritance-based systems were most popular around the turn of the millennium, but have since fallen out of favor.
Tied to the philosophy of the scene data structure are various organization and query systems, which are either spatial or indexed. Spatial query systems organize objects by their 2D or 3D position, and they speed up various geometric queries, for example “find the bodies colliding with this ray/box/sphere” or “iterate through the enemy objects in the scene in order from nearest to farthest from the player”. Indexed query systems, on the other hand, speed up finding particular objects in the scene by non-spatial criteria (“find the player object”, “find the active camera”).
In this mini game of ours we won't bother with such frills, since there are so few game objects and only two kinds of game object: a sprite or a text string. We will, however, implement a tag system that lets us readably refer to particular game objects (“the player's car”, “the high score counter”, etc.), but we won't build any kind of query optimization on top of it.
Polymorphism is provided by a union-style model, in which we use a single struct Object to represent both types of game object. The role of the scene data structure is filled simply by an array of type std::vector<Object>.
Game objects have a mass and a velocity. Text strings, on the other hand, have an rgba color and the necessary font information: font ID, size and character spacing.
The tag system and the helper functions find_sprite() and find_sprite_index() give us an easy way to find the game objects we need in the scene once we implement the game logic.

4#include <vector>65enum Tag {66 TAG_NONE = 0,67 TAG_PLAYER,68 TAG_ENEMY,69 TAG_ROAD,70 TAG_LIFE1,71 TAG_LIFE2,72 TAG_LIFE3,73 TAG_SCORE,74 TAG_HIGH_SCORE,75 TAG_MINUTES,76 TAG_SECONDS77};7879struct Object {80 float x, y;81 int img;82 Tag tag;8384 // If img == IMG_TEXT:85 char text[64];86 float r,g,b,a;87 int fontId, fontSize, spacing;8889 // If img != IMG_TEXT:90 float mass, velx, vely;91};9293std::vector<Object> scene;9495int find_sprite_index(Tag tag) {96 for(size_t i = 0; i < scene.size(); ++i)97 if (scene[i].tag == tag) return i;98 return -1;99}100101Object *find_sprite(Tag tag) {102 int i = find_sprite_index(tag);103 return (i >= 0) ? &scene[i] : 0;104}105106void remove_sprite_at_index(int i) {107 scene.erase(scene.begin() + i);108}109110void remove_sprite(Tag tag) {111 int i = find_sprite_index(tag);112 if (i >= 0) remove_sprite_at_index(i);113}Listing 9. batman.cpp – Scene data structure.
This way we can write find_sprite(TAG_PLAYER) to find the sprite corresponding to the player's Batman car. These lookup functions have linear complexity, so if the game has several hundred objects, their performance is no longer very good. With fewer than a hundred sprites, however, performance is more than sufficient.
State machine and scene rendering
Besides the scene system, at the heart of every game there is always some kind of state machine system – in practice, several. In game code these are either implicit boolean farms or some kind of abstracted state machine classes. For this game we implement the popular concept of a room, which is perhaps most visible in the old Sierra and LucasArts adventure games.
246void (*currentRoom)(float t, float dt) = 0;247248EM_BOOL game_tick(double t, void *) {249 static double prevT;250 float dt = MIN(50.f, (float)(t - prevT));251 prevT = t;252253 if (currentRoom) currentRoom(t, dt);254255 for(Object &o : scene) {256 if (o.img != IMG_TEXT) draw_image(images[o.img].glTexture, o.x, o.y, images[o.img].width, images[o.img].height);…259 }…261 return EM_TRUE; // Keep the game loop running262}Listing 10. batman.cpp – Room system.
The function pointer currentRoom keeps track of the current room. Each room has its own update function, which is called from the game's main loop. The updated game_tick() function also contains the scene's sprite renderer: we simply iterate through the scene array and draw every sprite in the scene on screen. This means that the drawing order of the sprites is naively determined by the order of the array. In more complex games it's popular to sort objects into depth order, “z order”, or to apply depth buffering, “z buffer”. (In that case the function remove_sprite_at_index() could be optimized to run in constant time by using the so-called swap-and-pop idiom.)
Each room is given two variables: the wall-clock time t and the elapsed time dt (delta t) since the previous frame was drawn. We use the variable dt to keep the animation speed constant regardless of whether the player's display refreshes at 60 or 120 hertz or at some other rate. As an important note, on line 250 we clamp delta times to at most 50 milliseconds (min. 20 fps), since otherwise the animation would break because of long delta times when the user briefly navigates to other browser tabs while playing.
We implement two rooms in the game: title and game. The title room shows the game's title image, while in the game room the actual game is running. The game can be extended with rooms of your own, for example a game over, pause or high score screen.
266void update_title(float t, float dt) {…269}301void update_game(float t, float dt) {…411}412413void enter_title() {414 scene.clear();415 scene.push_back((Object) { .x=0.f, .y=0.f, .img = IMG_TITLE });416 currentRoom = update_title;417}423void enter_game() {424 scene.clear();425 scene.push_back({ .x=0.f, .y=0.f, .img=IMG_ROAD, .tag=TAG_ROAD });426 scene.push_back({ .x=4096.f, .y=0.f, .img=IMG_ROAD, .tag=TAG_ROAD });427 scene.push_back({ .x=100.f, .y=120.f, .img=IMG_BATMAN, .tag=TAG_PLAYER, .mass=0.05f, .velx=0.05f });428 scene.push_back({ .x=0.f, .y=314.f, .img=IMG_SCOREBAR });429 scene.push_back({ .x=380.f, .y=330.f, .img=IMG_LIFE, .tag=TAG_LIFE1 });430 scene.push_back({ .x=440.f, .y=330.f, .img=IMG_LIFE, .tag=TAG_LIFE2 });431 scene.push_back({ .x=500.f, .y=330.f, .img=IMG_LIFE, .tag=TAG_LIFE3 });432 currentRoom = update_game;…443}Listing 11. batman.cpp – The game's rooms.
Both rooms have their own enter and update function. The enter function is responsible for populating the scene with the contents of the room, and the update function implements the game logic for the room. This code also shows how we define objects in the scene: adding a new object is handily done with a single line of code. Note how the object data is “hard-coded”: in a more generic system these might be read from some data file.
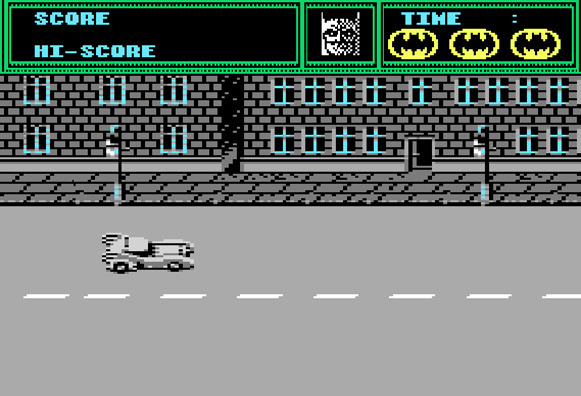
You can now try calling either the enter_title() function or the enter_game() function at the end of main() and get a different game view. Calling the enter_game() function already gives a startlingly game-like setup!
Keyboard handler
The Batmobile on the game screen is already waiting for Bruce Wayne to take the wheel. In browser games, input can come from a mouse, a touchscreen or a gamepad, but for a game this worthy we will of course implement PC master race controls, i.e. unbuffered keyboard input. It won't take many lines of code.
5#include <emscripten/dom_pk_codes.h>9uint8_t keysOld[0x10000] = {}, keysNow[0x10000] = {};1011EM_BOOL key_handler(int eventType, const EmscriptenKeyboardEvent *keyEvent, void *userData) {12 uint16_t code = (uint16_t)emscripten_compute_dom_pk_code(keyEvent->code);13 keysNow[code] = (eventType == EMSCRIPTEN_EVENT_KEYDOWN) ? 1 : 0;14 return EM_FALSE; // don't block the key's default action in the browser15}1617bool is_key_pressed(DOM_PK_CODE_TYPE code) {18 return keysNow[code] && !keysOld[code];19}2021bool is_key_down(DOM_PK_CODE_TYPE code) {22 return keysNow[code];23}248EM_BOOL game_tick(double t, void *) {…260 memcpy(keysOld, keysNow, sizeof(keysOld));261 return EM_TRUE; // Keep the game loop running262}263264void enter_game();265266void update_title(float t, float dt) {267 if (is_key_pressed(DOM_PK_ENTER) || is_key_pressed(DOM_PK_SPACE))268 enter_game();269}445int main() {…457 emscripten_set_keydown_callback( EMSCRIPTEN_EVENT_TARGET_DOCUMENT, 0, 0, key_handler);458 emscripten_set_keyup_callback( EMSCRIPTEN_EVENT_TARGET_DOCUMENT, 0, 0, key_handler);459460 enter_title();461}Listing 12. batman.cpp – Listening to the browser's key events.
We read the keyboard by registering a listener function for the browser's keydown and keyup events, which are sent when the user presses a key down or releases it. Emscripten provides ready-made system functions emscripten_set_*_callback() for this, through which we receive calls to the function key_handler. Inside this function, the call emscripten_compute_dom_pk_code() converts the key code into a 16-bit code number, which we store in the key array keysNow. These physical key (PK) codes therefore do not depend on the language settings (locale) of the user's keyboard, which suits games well. Incidentally, the code numbers correspond directly to the scan codes defined by good old DOS-era AT keyboards, right down to the 0xE0 extended flag. INT 09h is alive and well!
Alongside the game loop, we keep track of the new and old states of the keys by copying the contents of the keysNow array into the keysOld array with the memcpy() function familiar to C coders. This lets us distinguish fresh key presses from old ones from previous animation frames. In our game logic we can now use the function is_key_pressed() to test whether a key was pressed down just now (“edge trigger”), and the function is_key_down() to tell whether a key is being held down, possibly for a longer time already (“level trigger”). Continuing the logic, it would also be possible to produce an is_key_released() function, should the need arise.
As an example, the function update_title() has been updated to use these functions. If the player presses space or enter on the title screen, the game moves to the game room.
Batmobile go!
With the keyboard functions at our disposal, we can now implement the game logic for moving the car. The car's movement is handled on every animation frame in the game room. The game needs simple 2D physics simulation, so instead of making the arrow keys move the player's X and Y coordinates directly, we have them affect the player's X and Y velocity variables. Doing it this way lets us nicely reconcile the fact that the position of the player's car is affected not only by the arrow keys but also by collisions with other cars.

On every game frame the velocity variables are “integrated” into the position variables. This, like all other animation-dependent logic, is scaled by the variable dt (distance traveled = velocity · time) to keep the animation speed constant.
Game engines often use some notion of a camera object. Sounds like overkill, so at this point we'll implement a little camera trick instead. Rather than having the right arrow key move the player's car forward on screen and coding the camera to follow it, we move all other objects in the world to the left and keep the player car's X coordinate fixed the whole time. This produces the illusion of motion, as if the camera were glued to the player's car. The result is indistinguishable from the real thing, since according to Newton, motion or the lack of it is only a matter of reference point. (In 3D engines one would talk about view space and world space coordinate systems.)
When implementing this camera trick, we need so-called wraparound logic for the game's background images: when a background image disappears off the left edge of the screen, it has to be moved to the right so that it can scroll into view again a moment later. This produces the effect of an endlessly and seamlessly repeating background.
298#define SIGN(x) ((x) > 0.f ? 1.f : ((x) < 0.f ? -1.f : 0.f))299#define CLAMP(x, min, max) ((x) < (min) ? (min) : ((x) > (max) ? (max) : (x)))300301void update_game(float t, float dt) {302 Object *player = find_sprite(TAG_PLAYER);303304 // Brake the player's y velocity (friction)305 player->vely -= SIGN(player->vely) * MIN(fabsf(player->vely), 0.004f * dt);306307 // Increase the player's velocity with the keys308 if (is_key_down(DOM_PK_ARROW_UP)) player->vely += dt * 0.008f;309 if (is_key_down(DOM_PK_ARROW_DOWN)) player->vely -= dt * 0.008f;310 if (is_key_down(DOM_PK_ARROW_LEFT)) player->velx -= dt * 0.003f;311 if (is_key_down(DOM_PK_ARROW_RIGHT)) player->velx += dt * 0.001f;312313 // Clamp to maximum speed314 player->velx = CLAMP(player->velx, 0.f, 0.55f);315 player->vely = CLAMP(player->vely, -0.3f, 0.3f);316317 // Move in the y direction and clamp the y coordinate inside the play area318 player->y = CLAMP(player->y + player->vely * dt, 0.f, STREET_HEIGHT);319320 // Camera trick: the player's x velocity moves all game objects to the left.321 // Also wrap the background images to repeat endlessly322 for(Object &o : scene) {323 if (o.tag == TAG_ROAD || o.tag == TAG_ENEMY) o.x -= player->velx * dt;324 if (o.tag == TAG_ROAD && o.x < -images[IMG_ROAD].width) o.x += 2*images[IMG_ROAD].width;325 }…411}Listing 13. batman.cpp – Moving the player's car.




Tourist cars
The game's challenge comes from the civilian cars swerving dangerously and recklessly on the road. For this we need a random number generator. The C standard library has good old rand(), which we could use, but JavaScript also offers us the function Math.random(), which conveniently gives a random floating point number in the half-open range [0.0, 1.0[. We can access it with the system call emscripten_math_random().
We keep track of a counter spawnTimer, which decreases as the player advances along the street. When it drops to zero, it's time to add a new car as an obstacle, and the counter is reset to a suitably chosen value to wait for the next car to be spawned. We limit the maximum number of simultaneous cars in proportion to the player's current score (whose calculation we'll complete last). This way the game gets harder as the score increases.
The look of a new car is picked at random from eight different images, and its X and Y coordinates and velocities are also randomized. Enemy cars have a mass of 1.0 units, whereas the Batmobile, despite its menacing looks, is made of mere paper and weighs only 0.05 units. This makes car collisions challenging, which keeps the game interesting.
The opponents' cars are moved by iterating through the whole scene and picking out the objects tagged TAG_ENEMY. The cars move forward at their own speed according to billiard-ball physics. When they hit the edge of the street, their velocity is mirrored back towards the street. Just as with the player's car, velocity is integrated into position taking the time variable dt into account, so that the cars' speed is invariant with respect to the refresh rate.
When an opponent car drifts too far (two screen widths) from the visible game screen, it is removed from the scene. This makes room for newly spawned cars. It's best not to be overly aggressive with this cleanup, so that we get a realistic-looking effect where the game remembers already passed cars for a while, for example when the player crashes or stops.
Removing cars from the scene uses a noteworthy idiom: cars are removed from the scene vector while it is still being iterated. That's why we decrement the index with i-- during the iteration, so that we don't skip over the next element. This is an efficient way to thin out an array.
271// Returns a random float in [min, max[.272float rndf(float min, float max) {273 return min + (float)emscripten_math_random() * (max - min);274}275276// Returns a random integer in [min, max[.277int rndi(int min, int max) {278 return min + (int)(emscripten_math_random() * (max - min));279}295float spawnTimer, score;301void update_game(float t, float dt) {…326 // Spawn new cars327 spawnTimer -= 2.f * player->velx * dt;328 if (spawnTimer < 0.f && scene.size() < 15 + score / 10000) {329 spawnTimer = rndf(0.f, MIN(2500, 25.f + 22000000.f / score));330 scene.push_back((Object) {331 .x = GAME_WIDTH * 1.5f, .y = rndf(0.f, STREET_HEIGHT),332 .img = IMG_CAR1 + rndi(0, 8), .tag = TAG_ENEMY, 333 .velx = rndf(0.15f, 0.45f), .vely = rndf(-0.07f, 0.07f)334 });335 }336337 // Move the opponents' cars338 for(size_t i = 0; i < scene.size(); ++i) {339 Object &o = scene[i];340 if (o.tag != TAG_ENEMY) continue;341 // Move forward342 o.x += o.velx * dt;343 // Move vertically, but stay within the street344 o.y = CLAMP(o.y + o.vely * dt, 0.f, STREET_HEIGHT);345 // Mirror the y velocity if the car hits the edge of the street346 if ((o.y <= 0 && o.vely < 0) || (o.y >= STREET_HEIGHT && o.vely > 0)) o.vely = -o.vely;347 // Remove the car if it is too far outside the screen348 if (fabsf(o.x) > 2*GAME_WIDTH) remove_sprite_at_index(i--);349 }…411}423void enter_game() {…433 spawnTimer = 0.f;434 score = 0.f;…443}
Listing 14. batman.cpp – Spawning and moving the civilian cars.



Background music
Sound is at least half of a game, so it must not be forgotten. In native programs, implementing an audio library would take days, but web browsers offer such high-level audio playback features that we'll be done in a few minutes.
In the web world there are two ways to play sound: either by using the Audio element or through the Web Audio API. Both are compact to get started with, although annoyingly lacking in features, and a versatile web game audio engine has to creatively mix the two. Fortunately, in this 2D game the features of the <audio> tag alone are enough for us.
Unlike background music, playing game sound effects is time-critical. When Master Bruce flattens the citizens' cars, we want the sound effect to play in real time, immediately and not with a delay. This means we must load the desired sound effects into the browser's memory in advance, so that they aren't fetched from the web server only when the collision happens. So, in addition to the playback function play_audio(), our audio system needs a second function preload_audio(), which starts loading the sound files in advance. Every sound file used by the game is loaded into memory as soon as the page opens.
134extern "C" void preload_audio(int audioId, const char *url);135extern "C" void play_audio(int audioId, bool loop);136137enum {138 AUDIO_BG_MUSIC = 0,139 AUDIO_COLLISION1 // ..., AUDIO_COLLISION8140};445int main() {…452 const char * const audioUrls[] = { "batman.mp3", "c1.wav", "c2.wav", "c3.wav", "c4.wav", "c5.wav", "c6.wav", "c7.wav", "c8.wav" };453 for(int i = 0; i < sizeof(audioUrls)/sizeof(audioUrls[0]); ++i)454 preload_audio(i, audioUrls[i]);455 play_audio(AUDIO_BG_MUSIC, /*loop=*/true);…461}Listing 15. batman.cpp – C++ code of the audio system.

1mergeInto(LibraryManager.library, {19 preloaded_audio: {},20 preload_audio__deps: ['preloaded_audio'],21 preload_audio: function(id, url) {22 let audio = new Audio(UTF8ToString(url));23 _preloaded_audio[id] = audio;24 audio.preload = 'auto';25 },2627 play_audio: function(id, loop) {28 let audio = _preloaded_audio[id];29 audio.loop = !!loop;30 audio.play().catch(e => {31 let deferPlay = () => {32 audio.play().then(() => {33 document.body.removeEventListener('keydown', deferPlay);34 });35 };36 document.body.addEventListener('keydown', deferPlay);37 });38 },65});Listing 16. library_batman.js – JavaScript code of the audio system.
The function preload_audio allocates a new Audio object and starts loading it immediately. The given URL is associated with the desired ID number, which the C++ code can use to refer to the sound file.
The function play_audio allows a sound file to be played either looping forever or once. This function is complicated a little by the security model of web browsers: browsers don't allow sound to play spontaneously on pages the user has not interacted with yet. This prevents audio spam from background pop-up windows. So we have to prepare for the situation where sound playback has not yet been “unlocked” for the page, and delay playing audio clips until the user presses some key on the page. The game's title room proves its worth here: the game music is guaranteed to start at the latest when the player presses a key to start the game.
The sound player can play both background music and sound effects. The supported formats (wav, mp3, ogg, aac) do vary a little depending on the browser's version and age, though. One noteworthy limitation of this player is that, loaded this way, a single audio file can't have many parallel copies of the sound playing simultaneously. This limitation can be lifted either by so-called pooling of audio elements or by using the Web Audio API.
Ka-Pow!
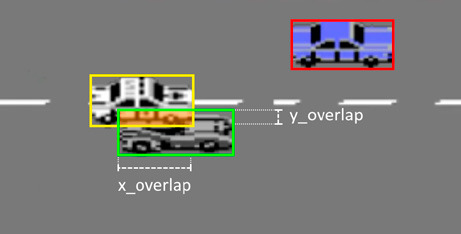
The player's Batmobile doesn't yet react to the cars driving on the street. To fix this, we need a collision detection routine. It is the most computationally intensive part of our game, because we have to test all pairs of objects in the scene to find possible colliding pairs. This kind of “all pairs” iteration is done with a so-called pyramid loop, where two indices i and j run through the objects under the condition i > j. This way we don't accidentally process any object pair twice.
For collision detection, the function get_overlap_amount() uses the simplest axis-aligned bounding box test (AABB). It is based on a “1D projection” along the X and Y axes and is a special case of the general Separating Axis Test theorem (SAT), which states that two convex bodies are separate from each other exactly when a line (in 3D, a plane) can be drawn between them with the bodies on opposite sides.
All collisions of convex 2D and 3D bodies are secretly 1D collisions, where the collision only needs to be handled along the collision's normal vector. Since in this game the objects are rectangles aligned with the XY coordinate system, we know that the collision directions are always aligned with the coordinate axes. To implement stable collision detection, it is important to carefully choose, of these two, the axis along which the bodies overlap the least. When a collision occurs, the bodies are pushed apart along the collision axis so that they no longer intersect, and their velocities are updated so that the bodies continue on their way in different directions.
The formulas for the change in velocities are obtained by solving a pair of equations based on the laws of conservation of momentum and kinetic energy. Here I recommend Chris Hecker's old four-part classic article series “Physics”, published in Game Developer magazine in 1996–1997, as well as the Google search terms “2D Rigid Body Dynamics” or “1D Collision Response”.
When a collision occurs, a Hollywood-dramatic sound effect is played and the bat loses one life. It is important to do this outside the iteration loop, so that the iterator indices i and j stay intact.
As a small mercy, the Batmobile becomes invulnerable for half a second after a collision. This is tracked by the lastHitTime variable. When the lives drop to zero, we return to the title room without much fanfare.
When implementing 2D arcade physics, besides the AABB collision test it is common to use either the generic SAT test for convex bodies, the GJK test based on Minkowski differences (Gilbert, Johnson, Keerthi), or a raster fill routine based on bitmask mipmaps that implements pixel-perfect collisions. When moving from arcade games to physics-based 2D games, numerically stable simulations are instead best outsourced to the “big guns”, i.e. the Box2D or Chipmunk2D libraries.
281// Computes the center point of a sprite282void get_center_pos(const Object &o, float &cx, float &cy) {283 cx = o.x + images[o.img].width / 2.f;284 cy = o.y + images[o.img].height / 2.f;285}286// Computes the X and Y overlap of two sprites287void get_overlap_amount(const Object &a, const Object &b, float &x, float &y) {288 x = MIN(a.x + images[a.img].width - b.x, b.x + images[b.img].width - a.x);289 y = MIN(a.y + images[a.img].height - b.y, b.y + images[b.img].height - a.y);290}291292float lastHitTime;293int lives;294void enter_title();301void update_game(float t, float dt) {…350 bool player_collided = false;351 for(size_t i = 1; i < scene.size(); ++i) {352 if (scene[i].tag != TAG_ENEMY && scene[i].tag != TAG_PLAYER) continue;353 for(size_t j = 0; j < i; ++j) {354 if (scene[j].tag != TAG_ENEMY && scene[j].tag != TAG_PLAYER) continue;355 Object &a = scene[i], &b = scene[j];356 float a_cx, a_cy, b_cx, b_cy, x_overlap, y_overlap;357 get_overlap_amount(a, b, x_overlap, y_overlap);358 if (x_overlap > 0.f && y_overlap > 0.f) { // SAT359 get_center_pos(a, a_cx, a_cy);360 get_center_pos(b, b_cx, b_cy);361 float xdir = SIGN(b_cx - a_cx) * x_overlap * 0.5f;362 float ydir = SIGN(b_cy - a_cy) * y_overlap * 0.5f;363 float xveldiff = 2.f * (b.velx - a.velx) / (a.mass + b.mass);364 float yveldiff = 2.f * (b.vely - a.vely) / (a.mass + b.mass);365 if (x_overlap <= y_overlap) { // Along X366 a.x -= xdir; b.x += xdir; // Separate the cars in X367 if (xdir * xveldiff <= 0.f) {368 a.velx += b.mass * xveldiff;369 b.velx -= a.mass * xveldiff;370 if (a.tag == TAG_PLAYER || b.tag == TAG_PLAYER) player_collided = true;371 }372 } else { // Collision along the Y axis373 a.y -= ydir; b.y += ydir; // Separate the cars in Y374 if (ydir * yveldiff <= 0.f) {375 a.vely += b.mass * yveldiff;376 b.vely -= a.mass * yveldiff;377 if (a.tag == TAG_PLAYER || b.tag == TAG_PLAYER) player_collided = true;378 }379 }380 }381 }382 }383384 if (player_collided) {385 play_audio(AUDIO_COLLISION1 + rndi(0, 8), /*loop=*/false);386 if (t - lastHitTime > 500) {387 lastHitTime = t;388 remove_sprite((Tag)(TAG_LIFE1 + --lives));389 if (lives <= 0) {390 enter_title();391 return;392 }393 }394 }…411}423void enter_game() {…435 lastHitTime = 0;436 lives = 3;…443}Listing 17. batman.cpp – Physics simulation.

After collision detection the game is functionally complete, but the game's scoreboard still gapes empty. As a finishing touch, we add text fields for the score and print the game's duration in MM:SS format.
A native game engine would integrate the FreeType 2 library at this point, but in the web browser the necessary functionality is, as you can already guess, built in again. Unfortunately, the web standards still lack the best possible API for this use, at least for now, but with a little creativity we can nevertheless rasterize a vector font into image textures.
Text drawing works as follows: we put a C64 font file in ttf format on the web server. Using the web browser's <canvas> API, we can draw each individual character of the font into its own texture, after which we can use the draw_image() function we implemented earlier to draw the individual characters. Old-school graphics coders will mutter into their beards, but the advantage of this strategy is that the implementation is short and fits neatly on a magazine page. More skilled programmers can test their abilities and implement a system that atlases the drawn characters on the fly into a font atlas texture managed at runtime (as a Google search term, the author recommends the “MaxRects” algorithm he developed). That way whole strings can be drawn with a single draw call, which makes communication from the CPU to the GPU more efficient.
We implement two functions in the JavaScript world: load_font() loads a ttf file from the desired URL and associates it with the desired ID number. The function upload_unicode_char_to_texture(), in turn, is used to draw a single Unicode character into a GPU texture. This function is extremely slow, on the order of tens of milliseconds, which is why we build a minimal cache data structure on the C++ side that keeps track of characters already rasterized. This way each drawn character is rasterized only once, when it is first shown on screen, and performance stays good. For the cache data structure we take good old std::map<>, keyed by the font ID, the Unicode character code and the font size.
The string-writing function draw_text() draws a whole sentence of text on screen using the desired parameters. The font color can be changed, and we'll later use this feature as a small attention effect when drawing the high score.
The result isn't entirely bulletproof – the biggest shortcoming of this mechanism is that the character spacing (kerning) of the text is fixed. So our system doesn't recognize that a small character like ‘i’ fits into a narrower space than, say, a wide character like ‘m’. There can also be issues with, for example, the height of the character ‘g’. With the C64 font these are not a problem, since it is a fixed-width, so-called monospace font anyway, but for example Arial or Times New Roman would not render as nicely.
Unfortunately, browsers have no suitable API for reading the spacing information contained in a font file. It is, however, possible to sniff out the spacing information and character heights yourself by using JavaScript's canvas element in a somewhat more complex way, but unfortunately the margin of this column is too small to present that code. (The algorithm works by rasterizing pairs of characters and examining their bounding box widths.)
Another noteworthy shortcoming is that the function draw_text() doesn't support line breaks; instead the function has to be called again for each line of text. Then again, a nimble programmer can easily lift this limitation if needed.


6#include <map>171extern "C" void load_font(int fontId, const char *url);172extern "C" bool upload_unicode_char_to_texture(int id, int ch, int size);173174enum {175 FONT_C64 = 0176};177178// (fontId, unicodeChar, size) -> GL texture179std::map<std::tuple<int, int, int>, Image> glyphs;180Image *find_or_cache_font_char(int fontId, int unicodeChar, int size) {181 auto t = std::make_tuple(fontId, unicodeChar, size);182 auto iter = glyphs.find(t);183 if (iter != glyphs.end()) return &iter->second;184185 Image i = { .glTexture = create_texture(), .width = size, .height = size };186 if (upload_unicode_char_to_texture(fontId, unicodeChar, size)) {187 glyphs[t] = i;188 return &glyphs[t];189 }190 return 0;191}192193void draw_text(float x, float y, float r, float g, float b, float a, const char *str, int fontId, int size, float spacing) {194 for(; *str; ++str) {195 Image *i = find_or_cache_font_char(fontId, *str, size);196 if (i) draw_image(i->glTexture, x, y, i->width, i->height, r, g, b, a);197 x += spacing;198 }199}445int main() {…456 load_font(FONT_C64, "c64.ttf");…461}Listing 18. batman.cpp – Loading and drawing fonts, C++ code.
1mergeInto(LibraryManager.library, {39 loadedFonts: {},40 load_font__deps: ['loadedFonts'],41 load_font: function(fontId, url) {42 new FontFace(`font${fontId}`, `url(${UTF8ToString(url)})`).load().then(face => {43document.fonts.add(face);44_loadedFonts[`font${fontId}`] = 1;45 });46 },4748 upload_unicode_char_to_texture__deps: ['upload_flipped'],49 upload_unicode_char_to_texture: function(fontId, unicodeChar, fontSize) {50 if (!_loadedFonts[`font${fontId}`]) return 0;51 let canvas = document.createElement('canvas');52 canvas.width = canvas.height = fontSize;53 let ctx = canvas.getContext('2d');54 ctx.fillStyle = 'black';55 ctx.globalCompositeOperator = 'copy';56 ctx.globalAlpha = 0;57 ctx.fillRect(0, 0, canvas.width, canvas.height);58 ctx.globalAlpha = 1;59 ctx.fillStyle = 'white';60 ctx.font = fontSize + `px font${fontId}`;61 ctx.fillText(String.fromCharCode(unicodeChar), 0, canvas.height);62 _upload_flipped(canvas);63 return 1;64 },65});Listing 19. library_batman.js – Loading fonts, JavaScript code.

Scoring
Accompanied by the cheers of a fan crowd awaiting the game's release, we run into the home stretch of our game logic. Now we finally put to use our original plan, according to which the objects on the playfield are either sprites or text strings. Text strings are defined by setting the object's .img variable to IMG_TEXT. We now add four text strings to the game room that represent the boxes of the scoreboard.
At the same time, we extend the update_game() function to update these scoreboard values. In addition, we return to the game_tick() function and add to it a call to the draw_text() function for every text string object, so that they get drawn correctly.
7#include <stdio.h>248EM_BOOL game_tick(double t, void *) {…255 for(Object &o : scene) {256 if (o.img != IMG_TEXT) draw_image(images[o.img].glTexture, o.x, o.y,images[o.img].width, images[o.img].height);257 else258 draw_text(o.x,o.y,o.r,o.g,o.b,o.a,o.text,o.fontId,o.fontSize,o.spacing);259 }…262}296float gameStartTime, highscore = 5000;301void update_game(float t, float dt) {…395 // update the player's score and high score396 score += player->velx * dt;397 highscore = MAX(score, highscore);398399 // write the new score into a string400 sprintf(find_sprite(TAG_SCORE)->text, "%06d0", (int)score/10);401402 // write the high score into a string and flash the text red-white if the high score is ours403 Object *o = find_sprite(TAG_HIGH_SCORE);404 sprintf(o->text, "%06d0", (int)highscore/10);405 o->g = o->b = (highscore == score && fmod(t, 1000.f) <500.f) ? 0 : 1;406407 // update the play time in mm:ss format408 int gameSeconds = (int)((emscripten_performance_now() - gameStartTime) / 1000.0);409 sprintf(find_sprite(TAG_MINUTES)->text, "%02d", gameSeconds / 60);410 sprintf(find_sprite(TAG_SECONDS)->text, "%02d", gameSeconds % 60);411}419Object create_text(float x, float y, Tag tag) {420 return (Object) { .x=x, .y=y, .img=IMG_TEXT, .tag=tag, .r=1.f, .g=1.f, .b=1.f, .a=1.f, .fontId=FONT_C64, .fontSize=20, .spacing=15 };421}422423void enter_game() {…437 scene.push_back(create_text(165.f, 364.f, TAG_SCORE));438 scene.push_back(create_text(165.f, 332.f, TAG_HIGH_SCORE));439 scene.push_back(create_text(465.f, 364.f, TAG_MINUTES));440 scene.push_back(create_text(510.f, 364.f, TAG_SECONDS));441442 gameStartTime = emscripten_performance_now();443}Listing 20. batman.cpp – Scoring.
Our game is now complete, save for your final compile command. Let Metacritic rage – how proud you get to be! World-famous game critics shower praise on your creation, and your game is passed around on warez BBSes and floppies. Your dream is immortalized in the stars!
Sequel warning
The game code has room for further development in many directions. Several improvement ideas were already mentioned along the previous sections; here are a few more.
The game logic could be extended by adding obstacles or collectible power-ups to the road, by offering extra lives after certain scores, or by making the AI cars' driving logic more sophisticated so that their movement wouldn't be so predictable. The AI cars would also look considerably more lively if you drew a few different animation frames for them to depict the wheels turning.
Using the WebSockets API (or WebTransport, which is still in draft stage at the time of writing), you could add multiplayer support to the game. A second player could, for example, control the movement of the civilian cars as an opponent, or two player cars could race each other in the style of Micro Machines.
One thing to note about scores is that the browser does not remember the high score when the page is visited again. Storing high scores locally would be extremely easy to implement using the local storage API. A global high score table based on XHR JSON API communication would bring offline competitiveness to the game. On the other hand, with the current rules it is easy to cheat on the score – finding out how is left to the player as an Easter egg.
The game has the shortcoming that resizing the browser window does not update the size of the canvas element; instead the page has to be reloaded. This is easily fixed by listening for browser window resize events with the emscripten_set_resize_callback() system function.
Finally, it is worth mentioning that in the coming years the future of web rendering is heading towards the brand-new WebGPU API. This game code would make a good practice platform for implementing a WebAssembly-based WebGPU renderer.